


What is Soldering?
Soldering is the most common technique for joining two or more metals together. In the soldering process, two elements are used: heat and solder. A solder is a metal alloy that has a lower melting point than the metals do that are to be joined together. When the heat from a soldering torch comes into contact with the solder and metals, the solder will melt before the metals do, causing the melted solder to flow and connect the separate pieces together.
What tools or materials do I need to get started?
Solder: Solders are categorized into hard, medium, and easy (soft). The categories indicate their melting points. For example, soft solders have lower melting points than medium and hard solders. It is the hard solders that are typically used for precious metals. If a piece needs to be soldered more than once, start with a hard solder, and then move to a medium (or a medium and move to a soft). This way the first solder will not re-melt.
Note: It is important to take safety precautions when soldering. Wear protective clothing, eye protection, make sure the area is well ventilated, and don’t touch the tip or element of a soldering iron. The three major hazards of soldering are heat, fumes, and the lead content of the solder. When possible, substitute lead free solder for leaded solder.
Steps in Soldering:
1. Fitting
2. Cleaning
3. Fluxing
4. Solder Placement
5. Heating
Now, let’s go into a bit more depth about each step.
Step1: Fitting
Soldering is much more challenging when the two or more pieces of metals to be connected together do not make a fitted “join”; fitted join meaning the smooth, built-in or even point of connection with the other. The edges that will be soldered together must have a fitted match to ensure a secure and lasting bond. In order to do this, filing may be necessary. Make sure that the surfaces are free of dents, warping, and kinks. If joining two flat edges together (butt join), it is recommended to bevel the surfaces so that the metal or wire is overlapping the other. This will allow for a strong joint.
Step 2. Cleaning
It is important that your metals are clean, and free of dirt, grease, and oil. This is because solder will not flow on an unclean surface. Unclean surfaces include those with fingerprints! Cleaning can be accomplished by pickling or sanding. Pickling, a chemical process, is very effective.
Step 3. Fluxing
All areas to be soldered need to be covered with flux (unless using paste solder). Each piece of solder should also be fluxed. Soldering flux helps dissolve and prevent oxidation of the base metal. It also acts as a wetting agent allowing easier spreading of the solder around the join. There are many soldering fluxes on the market available for use.
Step 4. Solder Placement
Prepare a few snippets of solder; these are called pallions. With a pair of tweezers or a flux-moistened brush tip, place the solder paillon on the join. Do not use more paillons than necessary for the join, as it is difficult to melt and remove as well as causing blemishes. If excess solder does flow off the join, it can be removed by filing.
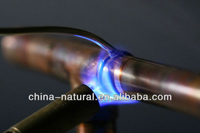
Step 5. Heating
Using a torch, carefully and quickly preheat the entire metal area evenly to provide solder flow. If the solder is heated without heating the entire piece first, it melts and forms a ball that cannot enter the join. Equally heat the two or more pieces that are to be connected together. Once the piece begins to glow, the solder will flow and will fill the seam. Working in soft light will increase your capability to see the metal glow. Melted solder is attracted by heat and will always flow toward the hottest spot. By moving the torch, you can target the solder to flow in the manner you desire.
Notes
Different solder alloys are of different solidus and liquidus. Click for detailed information.